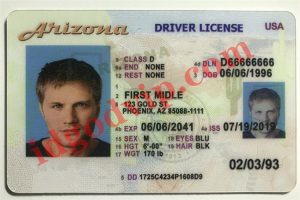
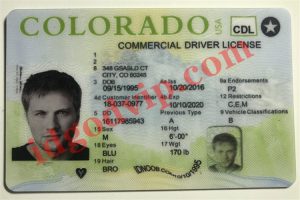
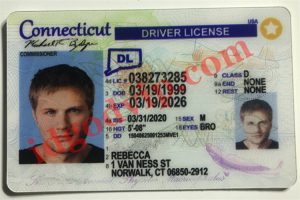
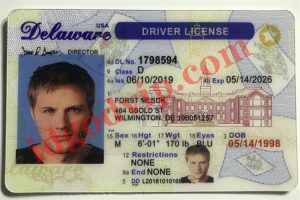
Print great fake ID cards
1
Get some Teslin paper for a real ID feel. Most government ID cards are printed on restricted cards that you can’t buy. Teslin paper is an incredible elective that feels basically the same as a government ID after you stack and manage the final result.
Many mid-to-top laser printers can print on Teslin paper, but if you try to use the printer without manually ordering the print settings, the print quality may be poor.
Note: Inkjet printers usually have some harder memories on Teflin. If you have an inkjet printer, try Artisyn. The nature of the ID material won’t be as large, but the print footprint will be cleaner.
2
Get a Butterfly Cover Pack that matches the thickness of the id card fake you need to replicate. After printing the ID on Teflin, you want to overlay it to match the thickness and feel of the state you are repeating. Get a laminator that matches the ID style thickness you wish to emulate. The packaging laminator is available in 4 sizes: 3, 5, 7 or 10 mm.
· Regular cover bags can be used at all times, but the butterfly cover is pleated to reduce the chance of air bubbles building on the ID. Since bubbles are probably the biggest clue that the ID is fake, you really need to use the butterfly bag.
Buy the cover bag with holographic hope to make your fake id look real. You won’t be able to find a similar example unless you buy it illegally or download the layout on the deep web.
3
Find an ID layout online that matches what you need to make a fake id. To get an accurate ID layout, you’ll need to download one from the downpours web page. You can also buy or download from the deep web. You can try carefully changing the scan or photo of your ID, but the target may not match the first one.
· To be careful about changing the real ID, you need to clone the device with copy/stamp and delete each line of abnormal text.
· Some layouts are available, which means you just type each line of text in the format and print it that way.
NOTE: If you do this, you may accidentally download an infection or malware to your PC. Again, you may need to use a VPN obtained by a public agency. If you’re serious about making fake IDs, keep in mind the dangers.
4
Take another photo with a similar base and transfer it to your PC. If your state ID photo has a blue undertone, place a blue curtain or cover behind you. Utilize triple-guide lighting to replicate the ambience of expert photos by setting up three light sources (2 on each side of the camera and 1 on top). Put the camera on the stand and use the selfie to take a photo of your id card fake.
· Try not to take pictures with your mobile phone. Whether or not the image looks great, the target is probably not about ID. Take pictures with slow shadow speeds with a top-notch camera.
5
Modify pictures in Photoshop, Firecrackers or GIMP to make them look real. Place your photo on the screen next to your copy of your real ID. Change the differentiation, brightness and immersion of the picture until you are sure it appears to be a real best fake id photo. Send the edited photo as another photo to save the first photo in case you are not satisfied with the final result.
· In Photoshop, click Change Pad afterwards. Select the layer the photo is on, then slide Splendor, Difference, and Immersion to change the variety and lighting in the photo.
6
Drag the picture onto the layout and trim any edges to fit. Import the new photo into ID format and drag it into place. Some layouts will naturally focus for you, but you may need to trim the picture to fit the presentation space. If the photo stays behind the formatting when you move it, right-click the photo and choose Layer Selection. Click Front or Bring to Front.
· Try to resize images as little as possible. This will reduce the chance of the target being ambiguous when printing fake ids.
7
Change the text in the container to match your description. In the United States (and many different countries), the eye tone and hair breed codes are 3 letters. They address the comparative shades of hair and eyes. Use the code that best matches the hair and eye color of the individual in the photo.
Variety code:
Eyes:
dark – dark
grey – dark
BLU – blue
GR – green
PNK – Pink
siblings – brown
HZL – Hazelnut
MUL – Multicolor
hair color:
BAL – not covered
siblings – brown
SDY – Sandy
dark – dark
grey – dark
WHI – White
BLN – Blonde
red – red
8
Change the g-code to limit and cover your id card fake. Some IDs have limitations and confirmations for impaired drivers, special exclusions, or a benefit. Check your state ID for restrictions and support codes. Assuming this is the case, write the travel vehicle’s underwriting code as “P” as this is the most widely recognized support. For idiomatic drivers, the limit code is usually “A” or deliberately kept clear.
Other normal restriction codes include “B” for individuals wearing corrective focus or glasses, and “R” for cruisers. If you are concerned about any of these, change the coverage code.
9
Enter information specific to your Slender Paint device in your modification program. Take advantage of the flimsy attraction device of your photo changer to incorporate your marks. Try to make the thickness of the lines match the thickness of the real markers. Choose a dark color for the shade of the line and use the mouse to draw your marks carefully. You may have to try a few times to get a legal mark.
· Freehand marking with the mouse can be cumbersome. Go ahead and try again until you get a mark that matches your real mark.
· On a large number of scannable fake ids, the marking is obvious and not real. Try to match the thickness of the lines by resizing the brush in the changer program.
Remember that the markings on the ID card will never exceed the limit on the real ID card. Trim anything over the marked box with the Eradication Tool.
10
Adjust your printer settings to make them the most noteworthy targets. Go into the printer settings on your PC and set each slider to the most noteworthy quality imaginable. On an actual printer, make sure all ink levels are high so the breed isn’t sloppy when printing the best fake id.
· When possible, use a color-based inkjet printer. Although they are inkjet printers, they generally produce vibrant results and function admirably with Teslin. Still, they are usually more expensive.
11
Print the ID on Teslin paper and overlap it into the butterfly bag. Print your photo. Printing pictures may take longer than expected. Let the paper sit for 30-45 minutes for the ink to dry. Lift the sheet and slide the scannable fake id into it to open the butterfly pocket. Place the protective paper that came with the bag on top of the butterfly bag.
· The Butterfly Bag is just a folded cover. The crease at the top is the side you go into the laminator first. This ensures that there are no air bubbles in the overlay.
12
Close the pockets and trim the edges to get the job done. Set the laminator to medium intensity. Put the paper, Teslin paper and butterfly bag in the laminator first to crepe. Step by step guide the ID card through the machine, let it sit for 30-45 minutes, then open the paper and discard. You’ll see pockets pinned around the fake id. Trim the edges with a utility blade for a perfect finish.